Owen struggles to gain weight, so we need to keep a close eye on it. He is non weight bearing so cannot stand on the scales. Weighing him at the hospital on their wheelchair or chair scales isn’t great as all the departments scales weigh differently meaning we don’t get a consistent result. You can hold him, and weigh yourself and him together, then take your weight off but then you have to hold him until he is still and he gets very heavy. Hubby came up with the idea sit Owen in a heavy duty washing basket, pop the basket (and Owen) on the scale (you can used two people to lift the basket on and off), then take the weight of the basket away and you have his weight. He is now 13 and only just got too big to be weighed this way.
Hints, tips and hacks from a Special Needs mum to help life run smoother.
Sunday, 4 April 2021
Sunday, 7 April 2019
Smell be gone!!
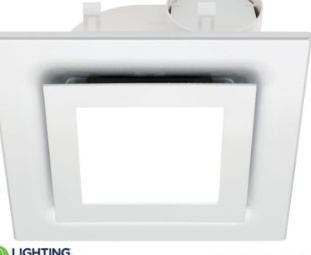
I can not lay claim to this idea, it was all hubby. I know it is an awkward subject but Owen can stink out the family room or his bedroom in an instant. So when we went to replace our old lights, we got some exhaust fan lights (similar to the attached photo) installed in these rooms:
They look great and now if there is an unwanted smell, we simply turn on the exhaust fan and the smell dissipates quickly.
Saturday, 25 August 2018
Velcro the world!!
Owen gets into his chairs via assisted transfers. His straps always get in the way and he ends up sitting on them. Frustrates me and it is huge pain in the you know what! So I decided I would attach self adhesive Velcro to the straps and chairs. I could then hold them in place whilst transferring him, that way the straps wouldn't get in the way. The best thing ever. Simple yet effective.
Tips: Make sure all the surfaces you are attaching the Velcro to are clean and dry. Also avoid any surfaces that have trays etc attached to them (that's why I attached the Velcro to the side of his wheelchair armrests rather than the top).
Update 24/09. I had a bit of issue with the stick on velcro coming off the wheelchair fabric straps. They needed washing, so I took them off, washed them and used IRON on velcro. Works perfectly and problem solved. If you can't take the straps off, maybe try a hair straightening iron. I haven't tried this but imagine it would work. Good luck.
Tips: Make sure all the surfaces you are attaching the Velcro to are clean and dry. Also avoid any surfaces that have trays etc attached to them (that's why I attached the Velcro to the side of his wheelchair armrests rather than the top).
Update 24/09. I had a bit of issue with the stick on velcro coming off the wheelchair fabric straps. They needed washing, so I took them off, washed them and used IRON on velcro. Works perfectly and problem solved. If you can't take the straps off, maybe try a hair straightening iron. I haven't tried this but imagine it would work. Good luck.
Sunday, 3 December 2017
Going on holidays while your child is in respite - get organised!
Are you tempted to try and get away while your child is at respite? Have you thought about going Interstate or overseas? Are you a bit nervous about what would happen in an emergency? Don be, if you are organised and prepare in advance it is doable and takes most of the stress away.
Planning Tips:
1/ Plan early and make sure you have a respite provider you know and book them in. Check on their specific requirements for if you are travelling whilst they care for your child..
Planning Tips:
1/ Plan early and make sure you have a respite provider you know and book them in. Check on their specific requirements for if you are travelling whilst they care for your child..
2/ Organise an emergency contact for your respite provider, most will require this in case
your gets sick or has an accident in their care. This person needs to know your child well (especially medically), know they are the contact and be willing to take your child into their care in an emergency.
3/ Ensure both the respite provider and emergency contact have the most up to date list of the following:
- Name, date of birth and hospital reference number
- List of all the doctors, therapists, schools and organisations involved in your child’s care and their location
- Current height and weight (date completed)
- Include current medications and dosage (include vitamins, probitoics)
- Allergies and what happens if exposed
- Diagnosis, list of issues, including things that are monitored, that might become an issue
- How they go under a General Aesthetic
- Include instructions about who they contact and for what circumstances eg Mic-key button comes out, seizures etc
4/ Have a back-up plan in case you are delayed upon your return. Organise someone to step in or see if the provider can have your child for longer or your emergency contact can stand in.
5/ Let your child's hospital, GP etc know you are going away and who you have left as your emergency contact.
6/ Write and sign a letter authorising the emergency contact to make decisions regarding your child on your behalf, include a photocopy of their medicare card and healthcare cards
5/ Let your child's hospital, GP etc know you are going away and who you have left as your emergency contact.
6/ Write and sign a letter authorising the emergency contact to make decisions regarding your child on your behalf, include a photocopy of their medicare card and healthcare cards
7/ Do up child's daily schedule for your emergency contact (respite should already have one), timings of medicine, meals and other relevant information - just in case they have to stand in.
8/ Leave a list of your itinerary and contact details along the way (just in case they can not get your mobile).
9/ Have an emergency return plan, nothing firm just have it in your mind how you would return if you really needed to. If you do the above it reduces the chance but I am a firm believer in having a plan b.
10/ Lastly enjoy your trip.
Monday, 30 October 2017
More Special Need Travel bed Hacks
Further tent ideas for travel bed Hacks
Many of you would have seen my travel bed Hack for a travel bed for less than $80. If not check out the link here:
Travel Bed Hack for less than $80
Given how much room (queens sized mattress) my travel bed takes up, I'm always on the look out for other options. I've seen a few more tents that may be suitable and therefore have perked my interest. Note I haven't actually tried these but don't let that stop you if you think it would be good for your child. Here they are and what I like (and don't like) about them. I would like to also point out I am not affiliated with any other these companies.
Here is an OZtrail Blitz 2 Mesh pop up tent - I've seen them at tentworld but am sure you can get them elsewhere
LIKE- easy to pop-up, no poles to have to put together. Would need a blow up double mattress or to be able to slide a single mattress in. Other ideas is to sew on something to tie it to the underside of a mattress and have it on top of a bed. Ranges in cost from $60 (on special) to $100. Lightweight - only wieghts 1.5 kgs
DON'T LIKE - you get in at the end, not the side which makes access difficult. Wouldn't be suitable for really rough kids
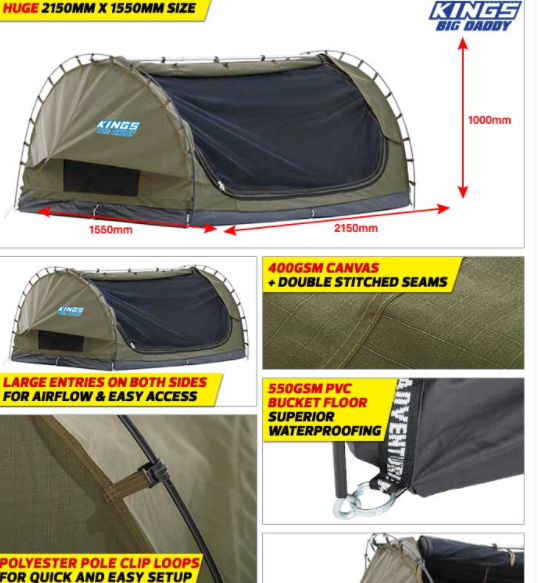
This tent, I have no idea how I came across it but I did and felt compelled to share - costs more (around $200) - https://www.4wdsupacentre.com.au/adventure-kings-double-swag.html
\
LIKE- you get in at the side, comes with it's own mattress and it's not a blow up - double sized. Looks sturdy (note I have not proven this). Has strong transport bag.
DON'T LIKE - Has poles,so would take longer to put together, heavy (14.8kgs) and large to transport. Not complete mesh
Many of you would have seen my travel bed Hack for a travel bed for less than $80. If not check out the link here:
Travel Bed Hack for less than $80
Given how much room (queens sized mattress) my travel bed takes up, I'm always on the look out for other options. I've seen a few more tents that may be suitable and therefore have perked my interest. Note I haven't actually tried these but don't let that stop you if you think it would be good for your child. Here they are and what I like (and don't like) about them. I would like to also point out I am not affiliated with any other these companies.
Here is an OZtrail Blitz 2 Mesh pop up tent - I've seen them at tentworld but am sure you can get them elsewhere
DON'T LIKE - you get in at the end, not the side which makes access difficult. Wouldn't be suitable for really rough kids
This tent, I have no idea how I came across it but I did and felt compelled to share - costs more (around $200) - https://www.4wdsupacentre.com.au/adventure-kings-double-swag.html
\
LIKE- you get in at the side, comes with it's own mattress and it's not a blow up - double sized. Looks sturdy (note I have not proven this). Has strong transport bag.
DON'T LIKE - Has poles,so would take longer to put together, heavy (14.8kgs) and large to transport. Not complete mesh
OZtrail Mozzie Dome 2 Tent - I've seen them at tentworld but am sure you can get them elsewhere
LIKE- you get in at the side, smaller than the one I use - you would need to add a blow-up mattress. Has great internal height. Reasonably priced - less than $100 on special, lightweight 1.9kgs
DON'T LIKE - Has poles,so would take longer to put together.
Good luck and if you try any of these please comment on how you find them as it might help others.
DON'T LIKE - Has poles,so would take longer to put together.
Good luck and if you try any of these please comment on how you find them as it might help others.
Saturday, 24 June 2017
Another idea to keep warm
Some of you may remember my post on keeping warm in winter when blankets are not an option. If you need to refresh your memory, here is the link Keeping warm
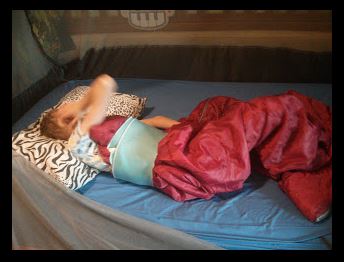
You may also remember the below was one of my solutions. It was a cheap sleeping bag with a physio strap around the chest to keep it on. Unfortuantely, I have found Owen has started to wiggle out of this, so it is no longer effective.
I like the warmth provided by a sleeping bag and the length it provides, so I worked on a way to keep it on. Here is the finished product:
So what is it? It's a do it yourself toddler sleeping bag! It's a sleeping bag with a polar fleece vest attached to the top.
What do you need:
How did I do it?
It is worth noting I am no "sewer", I don't have a fancy or good machine, so I did struggle with getting the tension right the thickess of the velcro and the sleeping bag, so don't look at my sewing and stitches, it is all far from perfect. You could go all out and match the vest and the sleeping bag, but I just used a vest I had.
Here is how you put him in
You may also remember the below was one of my solutions. It was a cheap sleeping bag with a physio strap around the chest to keep it on. Unfortuantely, I have found Owen has started to wiggle out of this, so it is no longer effective.
I like the warmth provided by a sleeping bag and the length it provides, so I worked on a way to keep it on. Here is the finished product:
So what is it? It's a do it yourself toddler sleeping bag! It's a sleeping bag with a polar fleece vest attached to the top.
What do you need:
- Sleeping bag - I get the cheap ones from Kmart/Big W as they are for "warmer" nights/climates, which make them perfect for house temperatures (but not so for camping). Usually you get one for around $12. Don't get the hooded ones. Also it will say hand wash only but I wash mine on a handwash/gentle cycle in the washing machine with no drama.
- Polar fleece vest
- Velcro (only required if you want the zip on the side)
- Scissors
- Sewing machine
Once you have your supplies think about where you want the zip of the sleeping bag. Owen sleeps between his left side and his stomach, so we needed the zip on his right side for maximum comfort. If he just slept on his back or sides I could have put the zip up the middle. It would have looked funny at his feet, but that wouldn't have been an issue.
- I cut the armholes clear from the vest
- I then sewed the vest to back, middle, top edge of the sleeping bag (making sure the sleeping bag zip would be on his right)
- I then sewed the left front piece of the vest to the front left of the sleeping bag meaning there was now an arm whole for his left arm.
- I sewed two pieces of velcro on the right front edge, one on the vest and the other on the bag, so they velcro shut when placing him in. If you have the zip up the middle you can sew the right front peice of the vest direct to the sleeping bag.
- You will also see I trimmed the zip off of the vest and put the vest inside out. I thought that might be more comfortable for Owen.
It is worth noting I am no "sewer", I don't have a fancy or good machine, so I did struggle with getting the tension right the thickess of the velcro and the sleeping bag, so don't look at my sewing and stitches, it is all far from perfect. You could go all out and match the vest and the sleeping bag, but I just used a vest I had.
Here is how you put him in
Saturday, 6 May 2017
Keeping teeth clean....................
Keeping teeth clean is one of the hardest jobs. Owen will reluctantly allow me to brush his teeth but only for a very short window of time. This has meant I have tried a large range of toothbrushes to find the one that works for him the best. Mind you what works for him, isn't going to work for everyone.
Trialling different toothbrushes is an expensive exercise. Over time I have tried almost all the supermarket kids ones both electric and manual. I found these were not the best option as I need to be in and out with lightening speed. I eventually discovered the 3 sided brushes on the market and trialed a number of them, so I have taken the time to review some of the ones I have tried. I am in no way affiliated with any of these companies but thought my experiences might help you decide which to try for your child.
My favourite - The Collis Curve
I like this one as it has three sides, so it does all three sides of the tooth at once. The bristles are soft so they don't irritate Owen's sensitive gums. The head is compact so it'd easy to manoeuvre in Owen's mouth.
I order mine through a company in the US called Kleenteeth ($5.50 US plus delivery) and buy them in bulk. I believe you can buy them in Australia these days but a quick google search couldn't locate them.
The "Surround"
Another 3 sided one. I'm not keen on this one as the head is too big for me to manoeuvre in Owen's mouth and the bristles are harder (although still soft) than the Collis Curve. Probably more suitable to a older child. You can buy these in Australia ($7 plus delivery) and also from the Kleenteeth site.
The Dentrust
I didn't like these for Owen. Another 3 sided brush. The bristles are silicon ( I think?), so they are not like usual bristles. They change from soft to harder depending on their temperature - you just run them under hot or cold water. The colder they are the harder they are. As they have a different feeling to most might be more suitable to those with very strong sensory issues. I also felt it was a bit big for manoeuvring around Owen's mouth. Again you can get these from Kleenteeth.
I also bought this one from IHerb
This is one I have given Owen to play with. He chews on it and gets him used to bristles in his mouth and hopefully compliments the brushing I do.
Good luck and happy brushing.
Trialling different toothbrushes is an expensive exercise. Over time I have tried almost all the supermarket kids ones both electric and manual. I found these were not the best option as I need to be in and out with lightening speed. I eventually discovered the 3 sided brushes on the market and trialed a number of them, so I have taken the time to review some of the ones I have tried. I am in no way affiliated with any of these companies but thought my experiences might help you decide which to try for your child.
My favourite - The Collis Curve
I like this one as it has three sides, so it does all three sides of the tooth at once. The bristles are soft so they don't irritate Owen's sensitive gums. The head is compact so it'd easy to manoeuvre in Owen's mouth.
I order mine through a company in the US called Kleenteeth ($5.50 US plus delivery) and buy them in bulk. I believe you can buy them in Australia these days but a quick google search couldn't locate them.
The "Surround"
Another 3 sided one. I'm not keen on this one as the head is too big for me to manoeuvre in Owen's mouth and the bristles are harder (although still soft) than the Collis Curve. Probably more suitable to a older child. You can buy these in Australia ($7 plus delivery) and also from the Kleenteeth site.
The Dentrust
I didn't like these for Owen. Another 3 sided brush. The bristles are silicon ( I think?), so they are not like usual bristles. They change from soft to harder depending on their temperature - you just run them under hot or cold water. The colder they are the harder they are. As they have a different feeling to most might be more suitable to those with very strong sensory issues. I also felt it was a bit big for manoeuvring around Owen's mouth. Again you can get these from Kleenteeth.
I also bought this one from IHerb
This is one I have given Owen to play with. He chews on it and gets him used to bristles in his mouth and hopefully compliments the brushing I do.
Good luck and happy brushing.
Saturday, 15 April 2017
Gravity chair fights Gravity
Again, this is not my idea. This one is from a lady called Cherie
in Queensland, Australia. Honestly Special Needs mums are the best problem
solvers! Cherie got sick of trying to move a Gravity Chair with her child in it, or
hoisting her child out, moving chair, then hoisting them back in. The Gravity
Chair people make a trolley but I believe it is quite expensive, so she made her own.
You need:
- Trolley. Cherie used this one from Bunnings. It's $95 and has a handle, lockable wheels and you can use a hoist with it. https://www.bunnings.com.au/toplift-300kg-folding-platform-trolley_p2970735
- Industrial strength velcro
to hold the chair to the base
Just hanging around on your pram or wheelchair
I like to have things handy. These are some neat little things I hang off of Owen's wheelchair that you might like to try.
A nappy Bag dispensers for hanging on prams. This is the one I bought at Big W for $4.50 but have since found them much cheaper on ebay.
I refill it with these pet waste bags I found at Kmart as they are much cheaper than the baby ones (only $2), fit and only a fraction smaller
A nappy Bag dispensers for hanging on prams. This is the one I bought at Big W for $4.50 but have since found them much cheaper on ebay.
I refill it with these pet waste bags I found at Kmart as they are much cheaper than the baby ones (only $2), fit and only a fraction smaller
Hand sanitizer, only a dollar or two from a cheap shop. You usually find them at the main counter in a box like this. And I buy 1 litre pump packs from the discount chemists and refill them from that.
I haven't got one of these yet but I will trial one next time I go to Kmart. A hanging wipes dispenser. Only $2.50 (got to love Kmart).
I know I mentioned this in a previous blog but I love my snack dispenser. It's made by Brica Shop around for the best price as currently it is $15 in Big W and $24 in Target.
I use a lanyard to attach toys to the chair. I just thread it through the toys and then the wheelchair straps, knotting it in the middle in need to ensure Owen can't choke on it. He can't throw the toy off and it makes it easier for him to manoeuvre and play with.
You will note I also hang a hat off the back too.
For more ideas on setting up your wheelchair/stroller refer to my previous blog The Sara Lea method and kitting out your wheelchair
Friday, 14 April 2017
DIY Little Room and Resonance Board
I have met some amazing mums on my journey with Owen. Many of which I met through Playgroup at Narbethong Special. Like me, lots of these mums put their creative caps on and build their own version of more expensive therapy/learning equipment. Nicole is one such mum and she has just made this amazing “little room” and “resonance board” for her boy. To buy the two you would be looking at around $3000. This one cost her around $500. She has been kind enough to allow me to share her instructions with you.
What you need:
From a hardware shop:
- PVC tubing (how many depends on how big you make your room and how long the pieces are that you buy)
- Plywood for the Resonance board and the sides of Little Room (as per above, how many depends on room size and size of sheets) – Extra tip, if you are in Australia and shop at Bunnings they will cut these to size for you.
- Optional PVC glue (Nicole did not use).
- 2 @ 3 way “t junction” joins
- Piece of Perspex
- Clear plastic tubing
- Little wooden dowels
- 4 long thin pieces of wood to frame the resonance board. Extra tip, if you are in Australia and shop at Bunnings they will cut these to size for you.
- (optional) pipe padding.
Order online
- 2 @ 4 way “L tee” pvc
- 6 @ 3 way PVC joins
There are a number of ebay shops online that sell these specialist products. I used a company called Klevercages
General supplies:
- Elastic
- Zip ties
- Sensory items to hang in the room or to stick around
the edges - Small wood screws
- Wood glue
Tools:
- Hacksaw (for the pvc)
- Drill
- “Step” Drill bit for drilling holes the Perspex
- Screw driver
- Paper, pen to calculate the lengths you need to cut.
Instructions :
Resonance board:
- Cut the plywood to size (if necessary and you haven’t had Bunnings do it for you)
- Cut the side pieces to size (if necessary and you haven’t had Bunnings do it for you)
- Screw and wood on the underside of the board (this will help it echo and make noise when the child uses it).
Little Room:
- Work out the dimensions you want for your child’s little room
- Measure the inside of your T junctions, corner joins etc. You need to take this into consideration when cutting your PVC to get your little room the right height. This is the complex bit. Remember the measure twice, cut once rule.
- Cut your PVC and put the frame together, see the pictures I have shared. Use glue if you want (But don’t if you want to grow it).
- Cut your plywood for the side and using zip ties attach it to the frame. Trim them with nail clippers to avoid any sharp edges
- Cutting Perspex is tricky so get a glass cutter to cut it to size for you.
- Drill holes in the Perspex and add it with zip ties to the top of your frame.
- Drill holes to hang your sensory items from.
- Attach them with elastic threaded through the plastic tubing.
Place the little room on top of the resonance board and play.
Note getting a larger child in and out can be an issue. Try a slide sheet or a sheep skin (noting sheepskin dulls the sound of the board). Nicole reports the little room is actually quite heavy and awkward to move and advised she is going to put handles on the side of the little room so it can be manoeuvred.
Thanks Nicole for allowing me to share your creation!
Saturday, 1 April 2017
Playing the Xylophone with limited fine motor skills
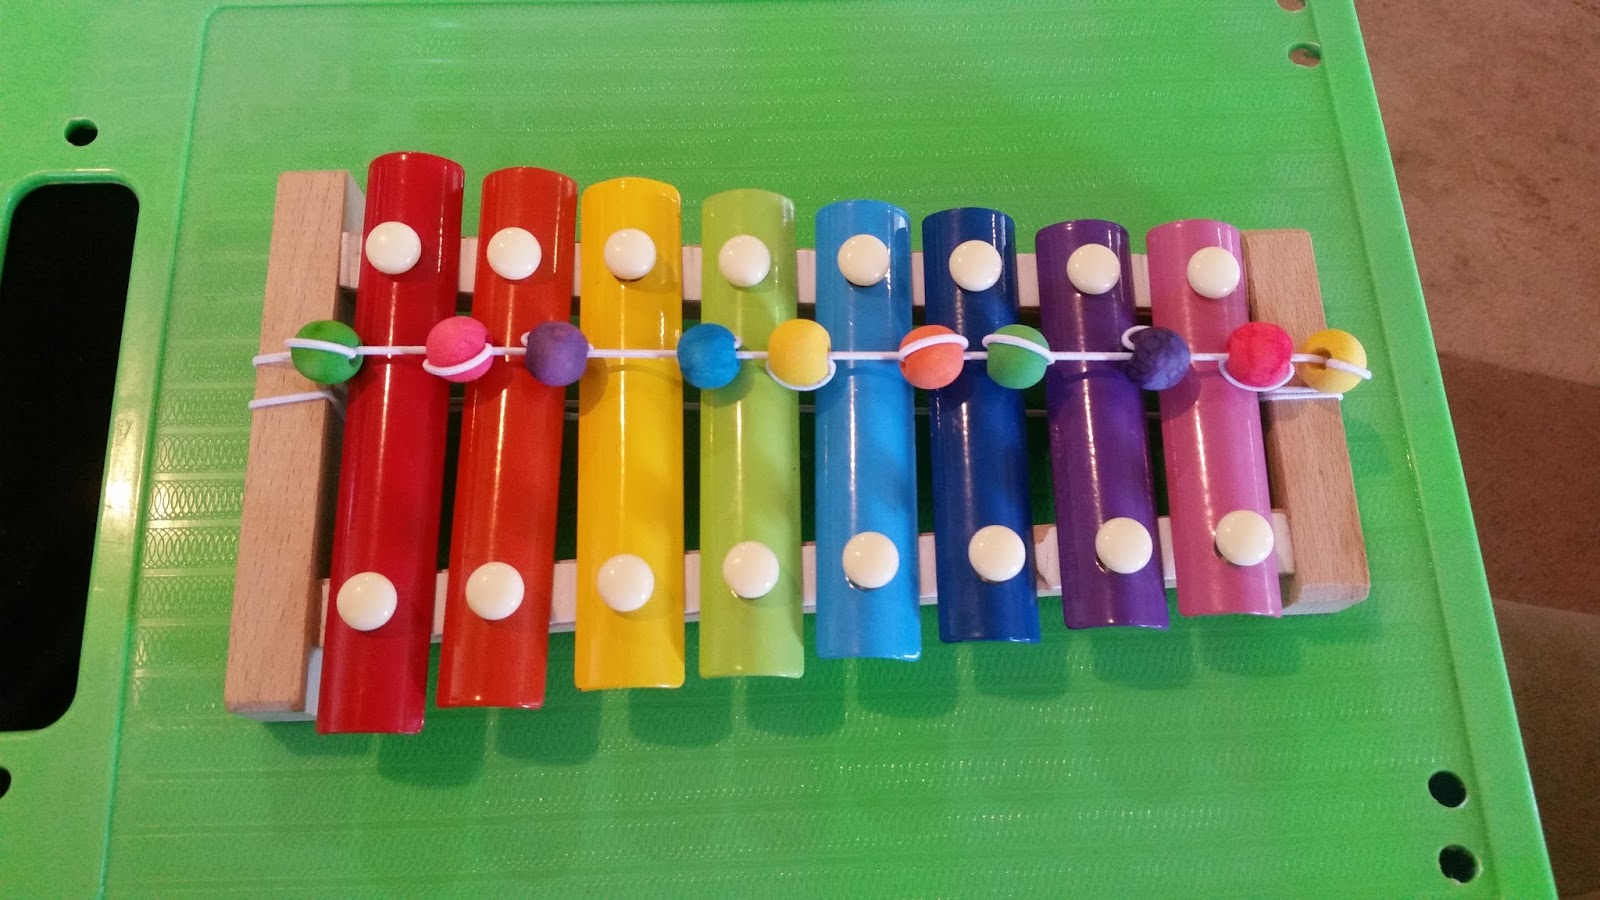
Kids love Xylophones but not everyone has the fine motor skills to play one. When I made my own sensory wall I put put an altered xylophone on it, then I decided I could put it on a one of my individual sensory boards to make it more portable. Here is how you can do one too:
You need:
- Plastic chopping board
- Wooden xylophone ( I got one from ebay for under $10 delivered)
- wooden beads (I got some pet parrot beads on ebay for under $5 delivered)
- hat elastic
- cable ties
- drill
Drill the holes in the board that will allow you to attach the board to something, also drill holes to allow you to attach the xylophone to the cutting board with cable ties.
Thread hat elastic through the beads. You will note I thread it through, then I looped back and went through the hole a second time. This just helps to keep the beads from moving around too much. Attach the elastic to the xylophone, then the xylophone to the cutting board. Attach the board to any fence you have created or put it on a tray/table for your child to play with.
Always supervise when using as nothing is 100% secure. Good luck and happy creating.
Saturday, 10 December 2016
Swim Pants
Swimming with a special needs child can be tricky, especially when they are incontinent. In a swimmer I look for contain-ability and clean-ability. So for as long as I could squeeze Owen into them he wore Huggies swim pants because they ticked both boxes. Here are some swimmers I have tried on Owen.
Eenee: http://www.eenee.com/contents/en-us/d56_eenee_swimmers.html
Look like normal swimmers, strings to tighten to ensure contain-ability and often preferred by schools. My only issue is when there is an accident and clean up is required there is no easy way to take them on and off. You can get these from Theraquatics. There is a very similar version made by Bokers that you can get them from Independence Australia

So Secure: http://www.sosecureproducts.com/containment-swim-brief
I really like these ones, they are designed to go under a swimsuit, have velcro so getting the right tightness for containment is easy and work like a nappy cleanup wise. You can get these from Independence Australia and Theraquatics
Swimmates:
These are disposable swim nappies, so they go under your swimsuit. I found a bag of 22 for $44 (including delivery) on ebay. Theraquatics sell them for pack for $28 (plus delivery if you live out of town) . So they are a little expensive but the ease of clean-up makes it worth it. Plus, I have managed to dry them and re-use them when there has been no accidents at home. Not sure if you are techinically supposed to but I did
Here are some links to some swimsuits I haven't tried.
Splash Brand Boardshorts. Around $50 to $60: http://www.splashabout.com/swimming/disability/
You can get these from Special Needs Solutions

Splash brand swimpants around $40 http://www.splashabout.com/swimming/disability/
Again you can get these from Special Needs Solutions
Note: I am in no way affiliated with any of these stores. You may find them cheaper elsewhere.
Good Luck
Look like normal swimmers, strings to tighten to ensure contain-ability and often preferred by schools. My only issue is when there is an accident and clean up is required there is no easy way to take them on and off. You can get these from Theraquatics. There is a very similar version made by Bokers that you can get them from Independence Australia
So Secure: http://www.sosecureproducts.com/containment-swim-brief
I really like these ones, they are designed to go under a swimsuit, have velcro so getting the right tightness for containment is easy and work like a nappy cleanup wise. You can get these from Independence Australia and Theraquatics
These are disposable swim nappies, so they go under your swimsuit. I found a bag of 22 for $44 (including delivery) on ebay. Theraquatics sell them for pack for $28 (plus delivery if you live out of town) . So they are a little expensive but the ease of clean-up makes it worth it. Plus, I have managed to dry them and re-use them when there has been no accidents at home. Not sure if you are techinically supposed to but I did
Here are some links to some swimsuits I haven't tried.
You can get these from Special Needs Solutions
Splash brand swimpants around $40 http://www.splashabout.com/swimming/disability/
Again you can get these from Special Needs Solutions
Note: I am in no way affiliated with any of these stores. You may find them cheaper elsewhere.
Good Luck
Monday, 21 November 2016
Use YouTube to your advantage
I take videos of Owen. I take videos of his milestones, weird behaviour, seizures and developmental snapshots. When I homeschooled him I even took them as evidence. All of these videos generally at some stage will be shared. The only issue is they are too large to keep e-mailing or to even store them on my phone.
The solution? Create a YouTube account for yourself and upload the videos to YouTube BUT make sure you select the privacy setting of "UNLISTED". If a video is unlisted you can't search YouTube for it but if you have the link you can watch it. So I e-mail the links to doctors/therapists to view or I access my YouTube account during appointments.
Not sure how to Upload to YouTube? I found this video describing how you upload as unlisted.
And if you are going back later to find them, Log into YouTube, go to My Channels, then uploads (as per the highlights below) and you will be able to see them all.
Saturday, 19 November 2016
Just say hello
Just say hello, when you see your kids staring at a special needs child, just say hello to the child and encourage your child to do so.
Today we took Owen to the park. Today I estimate 80% of the kids stared at him. I actually get why they do and I describe it in this post http://hintstipsandhacks.blogspot.com.au/2015/07/how-to-cope-with-not-being-invisible.html so this is not saying don't stare or notice Owen. I get that you will and your kids will too. This post is just saying kids like Owen have feelings and most of them love to be around other kids. This post is saying, it would make their day if you and your child said hello. This post is saying it would make their Mum and Dad's day if you and your child said hello. This post is saying, show your kids how it's done. This post is saying, just say hello.
Don't say it's rude to stare, just say hello.
Today we took Owen to the park. Today I estimate 80% of the kids stared at him. I actually get why they do and I describe it in this post http://hintstipsandhacks.blogspot.com.au/2015/07/how-to-cope-with-not-being-invisible.html so this is not saying don't stare or notice Owen. I get that you will and your kids will too. This post is just saying kids like Owen have feelings and most of them love to be around other kids. This post is saying, it would make their day if you and your child said hello. This post is saying it would make their Mum and Dad's day if you and your child said hello. This post is saying, show your kids how it's done. This post is saying, just say hello.
Don't say it's rude to stare, just say hello.
Thursday, 27 October 2016
Sensory Wall for less than $100
What I used:
- Plywood (I got off cuts for 50 cents each from the now defunct Masters)
- Pine for framing so it would sit out from the wall (I got 4 off cuts for 75 cents each from the now defunct Masters)
- Wooden Xylophone (ebay $9.20 incl delivery)
- Coloured wooden beads (I used pet bird ones and got them on eBay $2.70 incl delivery)
- Wind chimes ( $5.40 inc delivery)
- Wooden activity triangle ($20 Kmart)
- Plastic activity cube ($10 Kmart)
- Vibrating cat toys ($3 each cheap shops)
- Wooden castanets ($2.68 eBay including delivery)
- Bike bell (I got an easy ring one for approx $10 amazon)
- Black spray paint ($10 Hardware shop)
- Brush ($3 Hardware)
- Screws, cable ties, wood glue, hat elastic
- Screwdriver, jigsaw (if you need to cut wood),sandpaper, drill and drill bits
How I did it:
- I sourced the parts and waited for delivery. That is one of the longest parts as some take up to a month.
- I dismantled the activity cubes.
- I then put the plywood together and famed the back. This step was only necessary so I could put moving toys that could not "move" on a solid piece of wood. I both glued and screwed the frame on.
- I laid out the items and took a photo of them in place. I marked anywhere I would need drill holes and drilled them.
- I cut any larger holes/spaces with the jigsaw.
- I smoothed any edges with sandpaper.
- I painted the board and allowed it to dry.
- I threaded the beads through the hat elastic and attached it to the Xylophone.
- I drilled holes and screwed all the parts on.
- I cabled ties any parts on and trimmed the back.
How long did it take me?
Around 9 hours all up. This time includes finding the products on ebay, painting and putting it all together.
What would I do differently:
- Screw in the frame on from the back not the front, so you don't see the screws
- I used a spray on paint, I would try and paint with a roller/brush Or I would a piece of wood that did not require painting.
- I would also learn how to cut in a straight line and paint as both are appalling....
Happy making :-)
Tuesday, 4 October 2016
School lunch note
Owen is non verbal and needs assistance with eating. He eats both orally and via his button. He is still very much learning to eat so it is a balance between self feeding and being fed (as well as ensuring he gets adequate nutrition). To make it easier for his teachers to know what to feed him (and when) and for me to know how much he has eaten, I have always put a note of sorts in his lunchbox. My first offering was the laminated note (more on that in this link) but I have since come up with a better option.
I found a whiteboard notebook at Dasio for $2.80 and put labels on it. Now I record what he needs to be offered and when. There is even a spare page for any general notes like "serve hot". Here are some photos:
Tip keep the page open for a few minutes after you write on it to allow the marker to dry.
I found a whiteboard notebook at Dasio for $2.80 and put labels on it. Now I record what he needs to be offered and when. There is even a spare page for any general notes like "serve hot". Here are some photos:
Tip keep the page open for a few minutes after you write on it to allow the marker to dry.
Subscribe to:
Posts (Atom)